Showing posts with label tutorial. Show all posts

Wednesday, 3 April 2013

Tutorial: Painted Glitter Heels


Glitter shoes became immensely popular quite fast, but they seemed like such a pain with the layers upon layers of mod podge, glitter, mod podge, glitter, mod podge.. Not to mention when you walk it would crease the fabric and you would lose your glitter..

These shoes are much more subtle, and guaranteed to not lose glitter on me! Plus it's the perfect way to spruce up a pair of nude pumps and give them some more 'oomph!'. 


I chose my base colour as a frosty mint, and added two coats to the back of the shoes. I also painted the back of the heel itself, but stopped at the area that touches the ground. No point in painting that part, I say.


I let those two coats dry overnight to ensure that they were, in fact, dry. After that I started on the glitter coats. The first coat does a light splattering of glitter. The second coat really pumps it up because the first coat gives it a rough feel so the glitter really has something to stick to. And, if any spots were missed, your base coat will take care of that and no one will notice!

I smoothed out the glitter and made sure it was all laying flat, and now they're ready to go!


Easy peasy, now go rock your new glam kicks!!!

Note: You should clean the area before painting, and tape off the parts of the shoe you don't want painted just in case. I had no tape so I made sure to be extra careful. 
The two brands of nail polish I used are ones I found here in China. They're soooooo nice, I want to buy every colour the store has!

Tuesday, 12 February 2013

Dry Splatter Mani

I had a lot of fun with this one, also made a grand mess.
Instead of using nail polish and a straw with a normal splatter mani, I used a makeup brush loaded with loose pigment and tapped off the excess onto the nails. 


My colour choices. Next time I'll use much brighter colours, and maybe a base colour instead of clear.

How to:
Apply your base coat to a couple of nails, and start picking colours to put on your brush and tap over the nail so the pigment falls off. Once you figure the polish is probably dry, blow away the excess and add a top coat.

Thursday, 15 November 2012

Tutorial: Quick and Easy Clothing Display!

One thing I've noticed a lot online around pinterest and craft sites is that people need display ideas, and are constantly looking. In getting ready for this craft fair I decided I wanted to bring my clothing with me which meant I needed to come up with a display rack, for next to nothing since I had no disposable income for this project, and no car to make it to ikea.

I did however, have one of these in storage.
Before:
Almost the same exact one I had.

Now this project took about 5 minutes to do.
First what you have to do is unhook and remove the top racks going across the top, and the ones holding it up. Now you're left with an 'A' shaped frame.
Next you take the piece going across the middle and unhook that, and rehook it to the very bottom run. This will make it stand more narrow but free up those top rings.
Lastly, using vicegrips (or something similar) pull off the rungs going across on one side. I removed both of them. That leaves room for the things to hang, assuming they're not too long.

Thats it! I covered the places where the bars were with some tape so they weren't rough, and it's ready to go! It's not the sturdiest, but braced against the side of the table at a craft fair it should more than do the trick.

After:


Monday, 5 November 2012

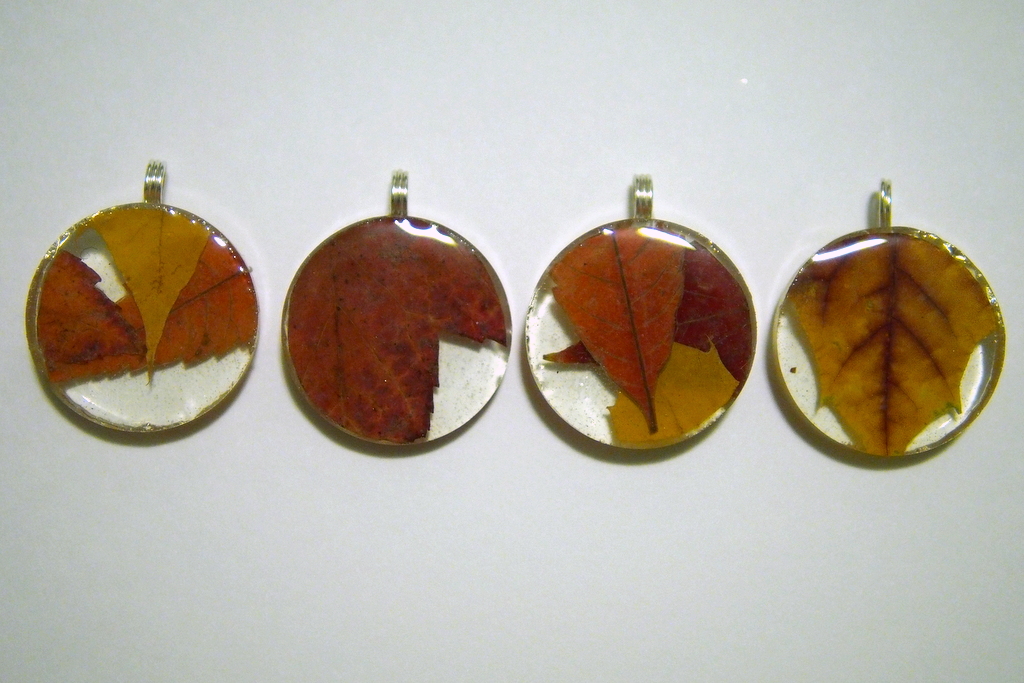
Leaves in Resin

I'm not quite ready for winter to come, as much as I'm loving all the chunky knit sweaters and cozy tights everywhere. I've been collecting and drying out leaves, which are now beautifully displayed in resin!


I love these! And when I say that, I mean it. Out of everything I make, it's rare that I make something that I'm as happy with as these. Perfectionist to a fault, possibly, constantly wanting to do better. There was actually a fifth but the oak leaves dried a boring brown and left the rest of the pendant looking flat. I didn't even finish it and it went in the garbage.

They're crystal clear and super colourful. I can't wait to get a few more mold shapes (I have no idea what happened to my rectangular one...) as I feel these would look great in an assortment of shapes and sizes. Also, their colours are going to hold me over all winter when it's cold and I'm longing for my favourite season to come back again.

I took all my leaves and tucked them into the heaviest book I own (The Hitchhikers Guide to the Galaxy), and left them pressed between parchment paper for a few days. Once they were done I put them right away into resin in hopes of preserving as much color as possible. I'm not sure what these will do long term, but for the time being I think they look wonderful.

Fresh out of the book!
The obligatory work in progress shot.


Monday, 24 September 2012

Mani Monday: Saran Wrap


Have you seen this kind of nail yet? You put your base coat down (2 coats of black) then add a top coat of whatever color (this strange beetle green) and while its when you pat your nail with scrunched up saran wrap. It's kind of cool, I must say, and super easy to do, though I did pat a couple nails on my right hand too soon and it took off a bit of the black as well.. Not really noticeable though.

Wednesday, 5 September 2012

Tutorial: Cross-hatched Nails

I think this mani is so fun! It was surprisingly easy to do, if you have a stamping kit and a little patience. Best part is you can do this with any stamp and get all sorts of different looks :).


How to:
Add a base coat if you so choose (I left mine blank)
Choose your colors! I used lilac, sky blue, soft red, navy blue and mint colored polishes, all creams.
Using your stamping kit (mine is Konad's m57) I added spots all over my nails one color at a time.
Clean up any polish that gets on your nails, add a top coat and you're done!

It's also a great way to use the stamps because they're not big enough to cover my whole nail.


Plase ignore all my cuts and scrapes :P
I also finally made myself another banner for my blog, and I quite like it. What do you think??

Edit: I ended up repainting them because my old topcoat sucks and the whole thing peeled right off, so this time I did it over black. I like this one way more.


Monday, 3 September 2012

The Sky Is The Limit

I am really starting to love all the galaxy DIY projects that are going on right now. It's nice to see such an underestimated thing of beauty (this whole wide galaxy of ours!) being appreciated. Here's my favourite galaxy tutorials to share with you!

Tutorial 
Bleach tshirt
Please if you have the source for this.. All I can find is dead links and tumblr posts
These are gorgeous! I think I should start making envelopes out of everything..

Friday, 29 June 2012

Tutorial: Square Scarf Shirt


Make a fun and simple shirt out of a square scarf and not much else!

Materials:
Square scarf. (choose one that fits around your ribs)
Rope, chain, or lace.
Grommets and grommet punch.

How to:


Hold the scarf up to your body. Pin where you want the straps to sit (either use your bra straps for reference, or eyeball it) I accidentally spaced mine a bit further apart than I wanted, but I didn't notice until it was too late. Oh well :).


Poke a hole and put a grommet in each side. 

Tie a piece of lace through the grommet, around the back of your neck and to the other side. Make sure it fits comfy. (Not pictured, sorry)


Grab the sides of the scarf and pull it around to your back. Take note of how high and low you want the closures to go to.


Measure and mark one inch spaces along each side of the scarf where you want the closure to go and add grommets along the way.

Before I decided to add more grommets to the top.
Lace everything up and you're ready!

Notes: I found since the scarf isn't stretchy its easier to lace up the back, turn it around, then tie the neck. I also didn't take care to make proper holes for the grommets to go (nor did I make them even) and just stretched holes in the scarf. It's old, the fabric is thin and I pulled the threads doing this but I don't care. Just keep in mind if you're going to use a scarf you really like, take more care in how you install the grommets. Or close it some other way. Next time I make this (with a better quality scarf) I'm going to close the back with a short zipper and do over the shoulder straps. Its your shirt, do with it what you want!


I told you it had potential!

Tuesday, 26 June 2012

Tutorial: Geometric Necklace


You can make your own geometric shaped necklace in ~10 minutes with 4 things that you probably already have.

Materials:
A chain
Strong glue
Sandpaper
And... Staples?!

How to:


-Get your staples. I like the colourful kinds myself and thought the 3 colours went nicely together. Break the staple sticks (for lack of a better word) into the lengths that you want.

-Sand the corners where it will touch your skin.. Don't want you getting scratched! I found a fine grain sandpaper and just a couple swipes worked fine.


-Glue the pieces together by putting glue on the shorter piece and pushing them together. I also put some glue across the whole back part to keep them together a bit better. I think a popcicle stick would fit there really good to make it super sturdy but alas.. I had no popcicles. Make sure you don't put so much glue so that it pushes out to the front area.


-Add glue along the edge and press the chain into it. Let dry and you're set!


There are so many possibilities! I'd love to see your versions if you try this.

Saturday, 21 April 2012

Cadbury Nails

I absolutely love Cadbury Cream Eggs, they're my favourite Easter snack. I love even more when the holiday has passed and they go on sale! Haha. I've always noticed that the tinfoil packaging on all these holiday candies are so pretty but what can you do with them...

How about a fun mani? I just finished this and had to share it with you.


What you need:
Scissors
Nail file
Clear nail polish
Candy wrappers

How to:
First, flatten out the tinfoil as best you can. It doesn't have to be perfect, but get all the big wrinkles out.


Lay the tinfoil on your nail and press down to make an imprint of it, and then following the lines, cut out the shape.


Put a layer of clear nail polish on your nail, and press the tinfoil down, making sure to press it around the edges.


If the tinfoil is too long, use the nail file to trim off the edges/shape it to your nail better. Repeat for the rest of the nails and you're done!


If you're using uncolored foil or one without a pattern you could add a very quick topcoat but take note that the colors will melt if you go over it too much. That might make it look cool too, though! When you're done, just peel the tinfoil off and use nail polish remover for the clear polish. If you want this to hold better, I would suggest trying nail glue, but I have none to see if it would work.

If you do this I would love to see your version!