Friday 30 December 2011

Tutorial: Easy Shrug/Bolero


I made this shirt for a craft swap, and loved it so much I made one for myself. Now I'm here to share it with you! I knew when I wanted to make this shirt, that I wanted it to look kind of knitted. Lucky for me I found this awesome knitted glam fabric with gold threads throughout. I bought brown for my secret santa and burgundy for me :)


How to:

Measure across your bust how far apart you want the sides to be. I went with 10". 
Lay your fabric flat, right side up. Now fold the sides in until they're 10" apart, with a little extra for seam allowance. Make sure its folded equal on each side. (*However much is folded over will be how long your sleeves are. These were folded approx 12" on each side, and go to my elbows. 


Pin and sew a curve down, this will act as the top of the sleeve. I laid on the fabric to see where my elbow would be to know what kind of a curve to make/how long to make it. You could also lay a shirt down to see what angle those sleeves go out at and use that as a guide. 

Notice that the shoulder part is more horizontal? As it should be.
When you have that done, cut the excess and fold the fabric in half to trace the curve for the other sleeve. Sew that as well. 


The only other measurement you need to make is the base of your neck to however long you want the shirt to be. Once you know that number (23" for me, I wanted mine a bit longer than I made the brown one for the swap) I measured from the top of the shirt down, and sewed a curve up to where the armholes would be. Make this more of a fluid curve since you don't have shoulders to take into account. (Sorry I don't have a picture of this step, woops!)


Once that is sewed, cut the sleeve holes (along the line where it's folded between your two stitches) and hem up all the edges. You are done! Now go rock your shirt that you made in no time!


I fully encourage you to make this for yourself or friends, but please do not use this tutorial for commercial gain. It's 100% my own.
If you have any questions on this tutorial please let me know.

**And just a reminder that it is the last day for the dinosaur skeleton necklace giveaway. Click on giveaways and contests up top to enter!!

Tuesday 27 December 2011

Tutorial: How to resize a hoodie


I forgot I had made this hoodie tutorial last year, and posted it on craftster. So now I'm posting it on here for all of you to see it. Do you have oversized sweaters that you want to fit you better? Maybe (like in my case) stole a boyfriend's old sweater? Learn how to fix it here.


I cut the sleeves to be 3/4 for 2 reasons, 1: I like 3/4 sleeves, and 2: since the shirt was so broad the sleeves would have been awkwardly short if I had left them normal.


Make sure to match up the top of the sleeve to the shoulder seam, and the bottom of the sleeve to the side seam. Then if anything needs adjusting do it on the sides so nothing is crooked.


Sunday 25 December 2011

Happy Holidays!


I hope all of you have a wonderful day with family and friends, whatever you celebrate this time of year. After a failed attempt at making cake pops, I've make a very questionable dessert to go with our supper (cake pop mix in the bottom of the tray, then chocolate, then skor.. We'll see what happens) but it will be great regardless :).

What are you all doing for the holidays?

I've got a whole list of things to share and tutorials to make so please keep checking back :) Thanks everyone for following along with me on my blog-adventures.


(I have no reason for including these pictures besides the fact that weenies are adorable. Enjoy.)

Friday 23 December 2011

Shredded

I've some new tees to go up in the store but you get to see them here first!

Bettie Page tee


Grey shredded tank


 Diagonal shredded tee

Thursday 22 December 2011

Lucky Star Earrings


I finally found a use for all those paper stars I made last month. I've been coating them and making them into earrings.
Once the rest of the stars are sealed I'll make some necklaces and bracelets to go with :). What do you think? I think they're adorable and had to show you a few of the pairs I made.

For sale here.
Here.
Here.

Saturday 17 December 2011

Painted Heels

Warning!: These turn a normal pair of heels into an extremely sexy 100% original pair of heels that makes people force you to stand on one foot so you can show them the other, and they look like shoes online that people sell for hundreds but will only cost you a fraction of the price! I already had the heels, paid $5ish for a pack of walmart brushes and $1.50 for each jar of paint.


This is really easy to do and you don't need expensive paints to make it look good. They didn't even take long to do! Tutorial is found here and is straight forward and simple. And trust me, if I can paint something that looks this good, anyone can. I have no painting ability besides nails, my mom is an amazing painter and she kept all those genes for herself.

Notes and Tips:

  • I forgot to buy yellow paint and ended up using a sharpie. This bled when I added the sealer (boo).
  • I can't paint fine lines so I used a black sharpie to do the outlines. This did not bleed.
  • Using the underpart of the heel is great because 1- its subtly hidden and 2- it does not bend so you don't have to worry about your walking around flaking off the paint. Someday I would like to try painting the other parts of heels but for now I plan to just paint the underneath. I also plan on doing this to every pair of heels I own, no joke (once I find a good sealer. I'm not careful/brave enough to go out without these sealed!)
  • Over time, the sealer yellowed the paints and seemed to melt back down. Now the shoes are sticky and it sucks. That's my own fault for being too cheap to get another kind and using the one I have for everything and going 'eh, it'll work..'. Seriously, look into it. Read on the cans what each one thing specializes in, and what materials you can put it on. It'll save you in the end.

Thursday 15 December 2011

One year of awesome and the week in review.


-On the weekend it was our one year anniversary (and what a wonderful year it's been). We finally got to go to an awesome little diner down the road (Rockin' Johnny's, where they have the side of a 50's Chevrolet on the wall, and the biggest milkshakes you can get.. So much so that you can't really eat your meal if you get one) aaaaand we got a couch!

Now for some storage and this room is finished. PS: See that on the table? Its a DIY Christmas present that I'll give a tutorial for soon enough...
-We've been marathoning through Jurassic Park (just finished the 2nd film) and it has been a fun pass time to get me in the mood to finish some dinos to send out. (Which, remember, you can still win. Click on giveaways at the top of the page).

-This weekend I plan to get some pictures of all my items I don't yet have in the store, and to share those with you. Some stuff from the craft show that I did that I haven't gotten around to doing anything with.

-And lastly, I've been asked to participate in a craft show near the end of January. Its a 'Gothic Bazaar' as they put it, and depending on what my situation is like I may sign up for a table. I think it could be fun :). And that might light the fire under my butt to start on some new things I want to try.

So that's my news, what I've been up to lately. I'm racking my brain trying to think of a new design for a purse for winter (as much as I love it, I'm tiring of the record purse after rocking it for a year). I want something new, but I set the bar too high. I need to come up with something else that I'll like just as much. I'm thinking recycled leather. Any of you have great purse photos you'd like to share?? Much appreciated if you do...

Ideas:


From here.

Made from a leather jacket.

Tuesday 13 December 2011

Tutorial: Knotted Purse (No sew!)


This is a really quick tutorial that I think is pretty neat. You can make your own purse with 100% no sewing! All you need is a square scarf. (Or with a little bit of sewing, a square of any non stretchy fabric at hand hemmed around the edges.)


If it has it, find the outside and fold it into a triangle right sides together.


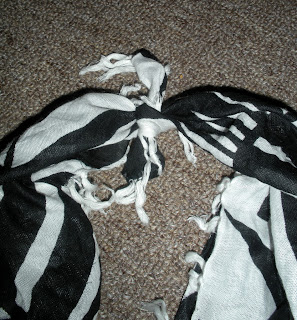
Almost halfway up the side, tie a simple knot. Do the same for the other side.


Turn it inside out and shake it a little, that'll help the fabric settle down and get its shape.


Tie a knot in the top points for a handle and you are good to go!

Now as long as you have a scarf (any size, the smaller the scarf the smaller the purse) that matches your outfit, you have a purse to match!

Monday 12 December 2011

Holiday Gift Ideas: Good Eats

I've always loved the idea of making foods for presents. I've made cookies and cakes for birthdays, but the holidays are something of their own. Here's a few recipes that you can package up or take with you to a family potluck that will for sure please a crowd. Enjoy!

Hot Chocolate on a stick! Recipe here.

Perfect for a potluck. Cinnamon chips with apple pie dip.

One of my favourite recipes. Spinach dip just like from the restaurant Kelseys. 
Cherry fudge. Mmm. 
Who would argue with getting one of these with a bow around it?
Or some of these in a stocking??