Saturday, 7 January 2012

Easy Sweet and Sour Meatball Recipe

Since the Mr and I decided to make a new recipe every week, for my first turn I decided to pick something quick and easy.

Queue looking at my recipe list from pinterest. Sweet and tangy meatballs with only 3 ingredients, served over rice.

Photo and recipe from Six Sister's Stuff.
How good does that look?! Tastes just as good. :)

I've never used store bought meatballs before, but they weren't bad (guaranteed to be a better recipe if you make your own). Put them in a crockpot with a jar of chili sauce and some grape jelly (the recipe asked for a whole jar, I used about 1/4) and let them stew away. Delish!

I'm honestly surprised at how great these tasted. Super tangy, without tasting like they're made with jam. Try it, I guarantee it won't disappoint.

Thursday, 5 January 2012

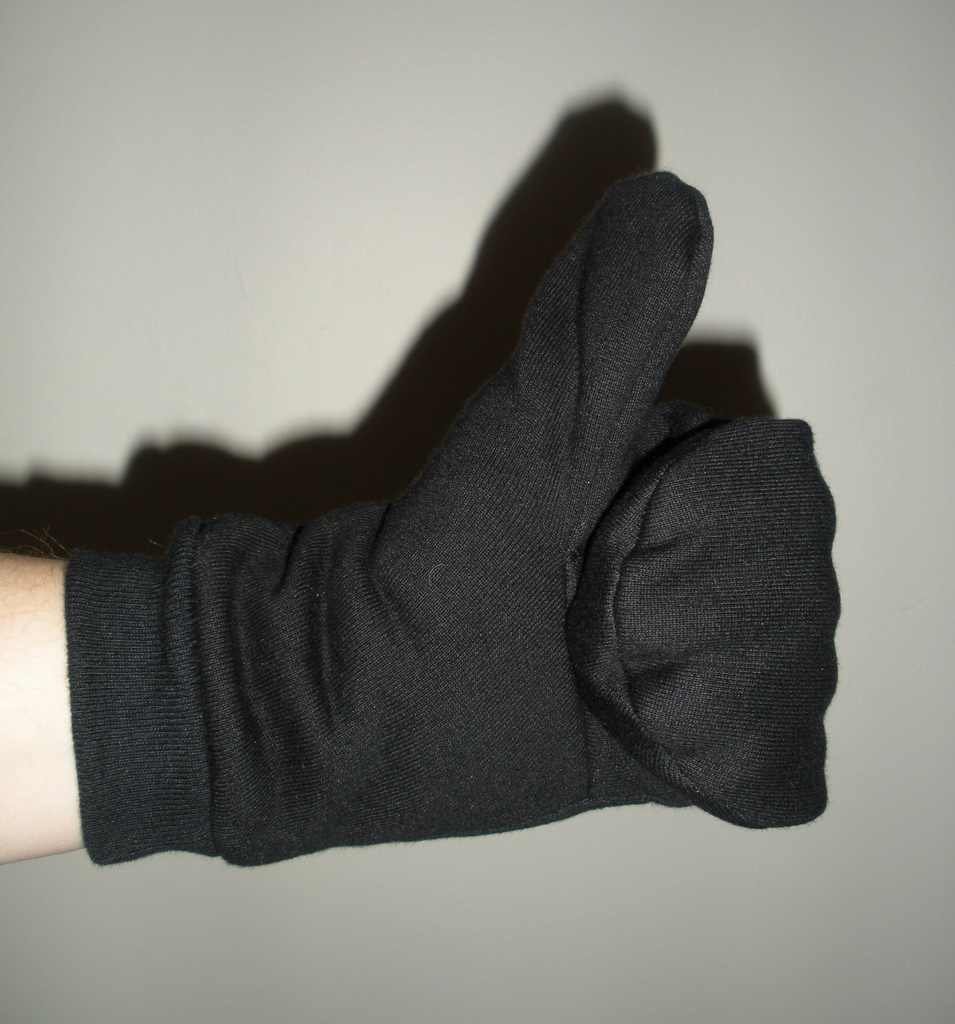
Tutorial: Quick and Easy Mittens

50 crafts of 2012 project. 49 remaining.


My boyfriend has been needing mittens forever, and I finally got a day off to make him some. Now I've seen quite a few mitten tutorials online, but most include two pieces cut out with the thumb jutting out at the side. I don't find this the most comfortable or logical, so I ended up making this pattern. Now I'll show you how to make the pattern to fit you, and how to sew it together.

First, to make the pattern:

Lay your hand down, fingers together, on a piece of paper. Trace a general shape around, making sure to add about a cm on each side of your hand to allow for your hand to fit through.


Draw a line across right where your thumb attaches.

Draw a second loop on the side for your thumb. Make that as long as your thumb plus a little bit, and as wide as, plus a little bit.

Make two of these, and cut them to look like these pieces. Cut 2 pieces of fabric for each, one from one side and one reversed. (The piece on the left is to be paired up with the piece on the right, not to be cut alone.)


Now you're ready to make your mittens!!!

Lay two pieces right sides together and sew above the thumb line, sew them together.


Now, take your third piece of fabric and put that between the other two. The next area you want to fold is the thumb and the thumb line, so make sure you have the right sides together.


When that is done, flip up the thumb area and sew the rest of the mitten, the wrist part.


Trim all the edges down, making sure to cut as much excess off the corner of the thumb and the top as you can, those parts won't lay right if there's too much extra fabric.


At this point you can hem the bottom and be done with it, but for his mittens I wanted to add a sweater like cuff to the end to keep them super snug on his arms. I took some ribbed knit fabric and measured it around his wrist. The piece shown here was cut in half to make both sides. Sew up that line.


Fold the sewn piece over, this way you don't see any seam on any part of the mittens. It makes everything look a lot smoother.


Insert that piece into the mitten and sew it on using a zigzag stitch or any stitch/sewing method you have for sewing stretchy pieces. you may have to stretch the cuff to fit properly inside the mitten when sewing because that piece of fabric will be more narrow.


Your new mittens are ready to go! Stay snug!

Tuesday, 3 January 2012

Goals For The New Year

I don't normally do the whole 'New Years Resolution' thing, but since I was deciding to make some goals in my life anyway, I thought I'd officially start today.

In real life:
I want to eat healthier. Working in a coffee shop filled with tasty baked goods is definitely tempting, and so I'm going to make an honest effort to not eat as many garbage-y foods (and especially drink less super sugary albeit delicious drinks) while at work. Also, where we're finally getting somewhere in our apartment, getting settled and whatnot, it's going to be easier to put some extra money into groceries at home to buy better things, more veggies and fruits, and healthy snack things instead of pizza pocket snack things (although I'll still buy those too, shh).

To continue trying to be active. It seems like every other week I'm either trying to get myself in shape, or forgetting about wanting to get myself in shape. I've got to be more aware of this goal and not forget to take the 10 minutes a day. And when the weather gets nicer, I want to get myself a bike. I haven't had one in years.

Find more fun things to do in the area. With all the things things to do in Ottawa and area (from free museums on Thursdays, to sketchy bridges covered in graffiti) there's a lot to do here. There's no reason we should be bored, and no reason why we should be in every night when there's a whole world to explore.

Taken in the same place as my last post.

Cook a new recipe every week. My boyfriend and I have decided to try out a new recipe of our choice every week. I'll start, next week, and he'll continue the week after that. It will be fun and easy way to try new things without having to go out and drop some big bucks at a restaurant all the time.

Online:
I want to be more active/friendlier in the blogging community. Which means if I go to a blog and I like something, instead of just favoriting it, I'll also make the effort to let the blogger know. I know how much work goes into trying to get a blog off the ground, and how many people may look at a site but don't say anything. It's nice to get some positive feedback every once and a while.

I want to be more active in putting things in my store. It's not hard for me to make things, but to drag out the light box, the equipment, set up the flashes, take (then convert, edit and crop) the pictures and write up a description?? Yuuuuuck. Not fun. But I've got things sitting here that aren't being seen by anyone because no one besides myself knows they exist. Way to disrespect my own art.

So those are my plans in a nut shell, not for new years but for the future in general. Make life better, funner and more interesting on and offline. :)

Sunday, 1 January 2012

50 Crafts of 2012 & The Dino-Winner

Happy New Years everyone! This past year has been amazing, and I'm so excited to see all that the new year brings. Thank you to everyone who has taken interest in my blog and who has been following along with me.

This year I plan to complete a list of 50 crafts, all of which I will share with you, make tutorials for, and/or offer in store. I've got a huge list (far over 50) and I'm sure it'll grow over the year. The point is theres 50 things, 50 specific things that I want to make, that I will make, within the year. (And probably, knowing myself, much more than that).

The first one, and the longest one to complete, will be a memory calendar. Each year I plan on writing down a memory of each day, and then if I can make myself do this for a whole year, to do it all again the following. That will be by far the hardest thing on this list. Wish me luck!

I hope you all join me and follow along, and by all means, join in if you'd like! Share a list of crafty things you want to do this year!

Here's a few items I want to make:

A recycled leather purse. (..Like this one maybe?)

A piece of artwork for the walls.

An attempt at glass etching.

Tank top tubes.

A little black dress.

A makeup stand. Done! Though I can't count it because it was actually finished in December. Though I'd like to make it much prettier than what it is (currently eyeshadows stuck on a baking sheet, hahaha).

A place to organize my jewelry.

Paper quilling.

A fork pendant I actually like.

Spats.


Do you have anything you want to get done in the new year?

~

Now, on to the winning free stuff part of this post (I put them together to avoid 2 posts in a day :P). 
Thank you to everyone who participated in my blog's first contest!! I've tallied all the votes and used random.org to select the winning number.

Aaaaand the winner is... Ashley Murray! Congratulations :). I will send you a message to get your mailing information. 

Friday, 30 December 2011

Tutorial: Easy Shrug/Bolero


I made this shirt for a craft swap, and loved it so much I made one for myself. Now I'm here to share it with you! I knew when I wanted to make this shirt, that I wanted it to look kind of knitted. Lucky for me I found this awesome knitted glam fabric with gold threads throughout. I bought brown for my secret santa and burgundy for me :)


How to:

Measure across your bust how far apart you want the sides to be. I went with 10". 
Lay your fabric flat, right side up. Now fold the sides in until they're 10" apart, with a little extra for seam allowance. Make sure its folded equal on each side. (*However much is folded over will be how long your sleeves are. These were folded approx 12" on each side, and go to my elbows. 


Pin and sew a curve down, this will act as the top of the sleeve. I laid on the fabric to see where my elbow would be to know what kind of a curve to make/how long to make it. You could also lay a shirt down to see what angle those sleeves go out at and use that as a guide. 

Notice that the shoulder part is more horizontal? As it should be.
When you have that done, cut the excess and fold the fabric in half to trace the curve for the other sleeve. Sew that as well. 


The only other measurement you need to make is the base of your neck to however long you want the shirt to be. Once you know that number (23" for me, I wanted mine a bit longer than I made the brown one for the swap) I measured from the top of the shirt down, and sewed a curve up to where the armholes would be. Make this more of a fluid curve since you don't have shoulders to take into account. (Sorry I don't have a picture of this step, woops!)


Once that is sewed, cut the sleeve holes (along the line where it's folded between your two stitches) and hem up all the edges. You are done! Now go rock your shirt that you made in no time!


I fully encourage you to make this for yourself or friends, but please do not use this tutorial for commercial gain. It's 100% my own.
If you have any questions on this tutorial please let me know.

**And just a reminder that it is the last day for the dinosaur skeleton necklace giveaway. Click on giveaways and contests up top to enter!!

Tuesday, 27 December 2011

Tutorial: How to resize a hoodie


I forgot I had made this hoodie tutorial last year, and posted it on craftster. So now I'm posting it on here for all of you to see it. Do you have oversized sweaters that you want to fit you better? Maybe (like in my case) stole a boyfriend's old sweater? Learn how to fix it here.


I cut the sleeves to be 3/4 for 2 reasons, 1: I like 3/4 sleeves, and 2: since the shirt was so broad the sleeves would have been awkwardly short if I had left them normal.


Make sure to match up the top of the sleeve to the shoulder seam, and the bottom of the sleeve to the side seam. Then if anything needs adjusting do it on the sides so nothing is crooked.


Sunday, 25 December 2011

Happy Holidays!


I hope all of you have a wonderful day with family and friends, whatever you celebrate this time of year. After a failed attempt at making cake pops, I've make a very questionable dessert to go with our supper (cake pop mix in the bottom of the tray, then chocolate, then skor.. We'll see what happens) but it will be great regardless :).

What are you all doing for the holidays?

I've got a whole list of things to share and tutorials to make so please keep checking back :) Thanks everyone for following along with me on my blog-adventures.


(I have no reason for including these pictures besides the fact that weenies are adorable. Enjoy.)